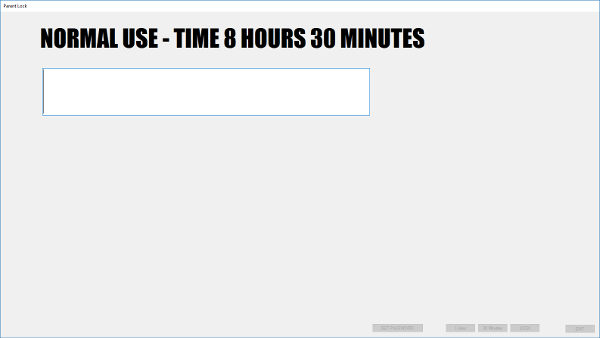
[NVIDIA CodeWorks for Android] provides all the 32-bit and 64-bit tools that you need for developing on Android.
Visual Studio on Windows 10
So far I’ve discovered Visual Studio 2015 Community Edition is compatible on Windows 10.
https://www.visualstudio.com/products/free-developer-offers-vs.aspx
The Visual Studio 2013 Pro installer from the Microsoft Store gives an error when running the setup: “Windows Program Compatibility mode is on. Turn it off and then try Setup again.” when all the compatibility options are off.
This version of Visual Studio 2013 Pro Update 5 does appear to install on Windows 10.
http://www.microsoft.com/en-us/download/details.aspx?id=48138
JDK on Ubuntu
When doing `Android` development, the Java Development Kit (JDK) is essential and here is an easy guide for installing the JDK on Ubuntu.
https://www.digitalocean.com/community/tutorials/how-to-install-java-on-ubuntu-with-apt-get
Amazon Echo
Amazon Echo now has an “Alexa Skills Kit” (ASK) for extending the capabilities of the Echo.
https://developer.amazon.com/appsandservices/solutions/alexa/alexa-skills-kit
Angelhack Seattle 2015
AngelHack 2015 is hosted by Google in Seattle Fremont.
http://angelhack.com/hackathon/seattle-2015
HP Idol On Demand
HP has a free API for processing unstructured data including face detection services.
https://www.idolondemand.com/
Project Tango
Project Tango has a Unity project for getting started with AI rebuilding your physical environment into meshes as you walk around.
https://developers.google.com/project-tango/apis/unity/unity-getting-started
The Verge reviews Project Tango –
http://www.theverge.com/2015/5/29/8687443/google-io-project-tango-augmented-reality
Purchase a Tango –
https://store.google.com/product/project_tango_tablet_development_kit
OpenCV
OpenCV (Open Source Computer Vision Library) is an open source computer vision and machine learning software library. OpenCV has a ton of algorithms for face and pattern detection for use in AR systems.
http://opencv.org/
MonoGame 3.4 Released
MonoGame 3.4 released which has important features like fixes to the FX import pipeline and support for pause/resume on Android.
http://www.monogame.net/2015/04/29/monogame-3-4/
Unreal 4.8 Released
Unreal Engine 4.8 released and that means I’ll need to upgrade my branch of the OUYA SDK from 4.7 into 4.8.
https://www.unrealengine.com/blog/unreal-engine-48-released
Forge ADB
The Razer Forge TV uses the usual Google ADB driver in the Android SDK extras, but here’s the extra developer info for connecting the Razer Tools to be able to connect with ADB.
http://developer.razerzone.com/forge-tv/developer-setup/
I’ve been adding engine support for `Forge TV` and created a doc as an entry point for developers.
https://github.com/ouya/docs/blob/master/forge_tv.md
Pebble SDK
Pebble has a developer portal where you can get the latest SDK, browse the examples, and read the documentation.
https://developer.getpebble.com
Cloud Pebble provides a cloud IDE and emulator for developing Pebble code.
https://cloudpebble.net
Pebble has a built-in compass.
http://developer.getpebble.com/guides/pebble-apps/sensors/magnetometer/
More Pebble Examples:
https://github.com/pebble/pebble-sdk-examples
Touch Develop
The kids did programming camp at Microsoft for the last couple weeks. They learned programming with a new web-based visual programming language called TouchDevelop.
https://www.touchdevelop.com
Graph Visualizer in Unity
The Playable Graph Visualizer has just released, a companion to the Playable Graph API, as an open source project (as usual, under the MIT/X11 license). It serves both as a debugging tool for your graphs, and a good example of how to use the Graph API.
https://bitbucket.org/Unity-Technologies/playablegraphvisualizer/
Blender: Make Simplified Chinese 3D Text in Blender
The `FZLanTingHei-B-GBK.TTF` font can be found [here].
Python Multipart Posts
To use a camera with the Raspberry PI, first [configure the Raspberry PI] to enable the camera.
In order to send large images from the Raspberry PI camera to a web server, the image has to be sent in parts. This requires the Python `poster` module. https://pypi.python.org/pypi/poster/
To be able to install a python module, `pip` has to be installed.
sudo pip install poster
This is the server PHP page that saves the image.
save_image.php
<?php $image = $_FILES["image"]; if ($image == null) { echo "Missing image to save!"; } else { echo "Saved image!"; $tmp_name = $_FILES["image"]["tmp_name"]; move_uploaded_file($tmp_name, "image.jpg"); } ?>
This Python script sends the image to the server.
save_image.py
#!/usr/bin/env python import urllib, urllib2 from poster.encode import multipart_encode from poster.streaminghttp import register_openers register_openers() url = "http://domain.com/path/save_image.php" print "url="+url filename = 'image.jpg'; if (os.path.isfile(filename)) : values = {'image':open(filename)} data, headers = multipart_encode(values) headers['User-Agent'] = 'Mozilla/4.0 (compatible; MSIE 5.5; Windows NT)' req = urllib2.Request(url, data, headers) req.unverifiable = True content = urllib2.urlopen(req).read() print (content) else: print 'No image file found to upload'; print '\r\nProgam complete.'
This script will capture from the camera and then call the above script to upload the image.
capture_image.py
#get access to the camera from picamera import PiCamera #import so we can invoke another script import subprocess #sleep so we can wait on the camera from time import sleep # create a camera object camera = PiCamera() #set the image resolution camera.resolution = (320, 240) #rotate the camera if upside-down camera.rotation = 180 #show preview with some transparency camera.start_preview(alpha=225) #wait two seconds for camera lighting sleep(2) #save image locally camera.capture('image.jpg') #stop the preview camera.stop_preview() #invoke the script to upload the image subprocess.call('python save_image.py', shell=True)
UV Layout
Apparently, UBISoft is big into this tool for UV Layout editing called UVLayout!!!
http://www.uvlayout.com/
Visual Studio on Mac
Finally there’s a decent code editor when you find yourself on Mac.
https://code.visualstudio.com/
Windows 10 – Raspberry PI 2
Windows 10 can be installed on the Raspberry PI 2 from a free download.
http://ms-iot.github.io/content/Downloads.htm
Backyard Brains
The future is here if you can hack the nervous system cheaply.
http://www.ted.com/talks/greg_gage_how_to_control_someone_else_s_arm_with_your_brain
https://www.backyardbrains.com/
BackyardBrains also has this awesome HackerHand.
https://backyardbrains.com/products/HackerHand
Servo Rotation
The servo can be turned clockwise, counter clockwise, and to the 90 degree position, but it lacks a way to query the current rotation. The rotation needs to be calculated manually and this script is a first attempt.
#!/usr/bin/env python import RPi.GPIO as GPIO import datetime import time servo_pin = 22 servo_pin2 = 18 # 60 degrees / 0.1seconds servo_speed = 0.1 GPIO.setwarnings(False) GPIO.setmode(GPIO.BOARD) GPIO.setup(servo_pin, GPIO.OUT) GPIO.setup(servo_pin2, GPIO.OUT) last_time = datetime.datetime.now() current_time = datetime.datetime.now() sumTime = datetime.timedelta(0, 0) accuracy = 0.01 targetRotation = 0 currentRotation = 90 pulse1 = GPIO.PWM(servo_pin, 50) pulse2 = GPIO.PWM(servo_pin2, 50) logTime = datetime.datetime.now() def log(msg): global deltaTime global logTime if (logTime < datetime.datetime.now()): logTime = datetime.datetime.now() + datetime.timedelta(0, 0.5) print msg return def reset(pulse): pulse.start(7.5); pulse.ChangeDutyCycle(7.5) return def update(pulse, targetRotation): global deltaTime global sumTime global servo_speed global accuracy global currentRotation log ("TargetRotation: " + str(targetRotation) + " CurrentRotation: "+str(currentRotation)) if (targetRotation == 90): pulse.ChangeDutyCycle(7.5) if ((currentRotation - targetRotation) < -accuracy): currentRotation += servo_speed elif ((currentRotation - targetRotation) > accuracy): currentRotation -= servo_speed else: pulse.ChangeDutyCycle(0) elif ((currentRotation - targetRotation) < -accuracy): pulse.ChangeDutyCycle(12.5) currentRotation += servo_speed elif ((currentRotation - targetRotation) > accuracy): pulse.ChangeDutyCycle(2.5) currentRotation -= servo_speed else: pulse.ChangeDutyCycle(0) return try: reset(pulse1) reset(pulse2) time.sleep(1) print "setup complete" while True: last_time = current_time current_time = datetime.datetime.now() deltaTime = current_time - last_time; sumTime += deltaTime; if (sumTime.total_seconds() > 3.0): #print (sumTime) sumTime -= datetime.timedelta(0, 3) targetRotation = (targetRotation + 45) % 180 update(pulse1, targetRotation); update(pulse2, targetRotation); time.sleep(0); except KeyboardInterrupt: print '\r\nProgam complete.' GPIO.cleanup();
Python Time Handling
Time and logic is needed to do anything fancy in Python.
#!/usr/bin/env python import datetime import time # global time of last frame last_time = datetime.datetime.now() # global time of current frame current_time = datetime.datetime.now() # a running some of the delta time of each frame sumTime = datetime.timedelta(0, 0) # define an update function def update(): # make global accessibles from function global deltaTime; global sumTime; #prints the current time hours, minutes, seconds, and milliseconds #print (datetime.datetime.now().strftime("%H:%M:%S.%f")) # if condition checks for 1 second to pass if (sumTime.total_seconds() > 1.0): # print the elapsed time over the last second print (sumTime) # reset the elapsed time sumTime -= datetime.timedelta(0, 1) return try: while True: # record the time in the last frame last_time = current_time # get the current time hours, minutes, seconds, milliseconds current_time = datetime.datetime.now() # calculate the time difference between frames deltaTime = current_time - last_time; # keep track of the elapsed time sumTime += deltaTime; # invoke the update function update(); # yield for the next frame time.sleep(0); # wait for a key to exit except KeyboardInterrupt: print '\r\nProgam complete.'
Raspberry PI 2 – Servo Control
Using pulse modulation, the Raspberry PI can adjust a servo.
https://www.youtube.com/watch?v=ddlDgUymbxc
Here I combined the LED blinking example with the servo example.
#!/usr/bin/env python import RPi.GPIO as GPIO import time led_pin = 15 led_pin2 = 16 led_pin3 = 36 led_pin4 = 37 GPIO.setwarnings(False) GPIO.setmode(GPIO.BOARD) GPIO.setup(led_pin, GPIO.OUT) GPIO.setup(led_pin2, GPIO.OUT) GPIO.setup(led_pin3, GPIO.OUT) GPIO.setup(led_pin4, GPIO.OUT) GPIO.setup(22, GPIO.OUT) p = GPIO.PWM(22, 50) p.start(7.5); try: while True: GPIO.output(led_pin, GPIO.HIGH) GPIO.output(led_pin2, GPIO.HIGH) GPIO.output(led_pin3, GPIO.HIGH) GPIO.output(led_pin4, GPIO.HIGH) p.ChangeDutyCycle(7.5) time.sleep(1) GPIO.output(led_pin, GPIO.LOW) GPIO.output(led_pin2, GPIO.LOW) GPIO.output(led_pin3, GPIO.HIGH) GPIO.output(led_pin4, GPIO.HIGH) p.ChangeDutyCycle(12.5) time.sleep(1) GPIO.output(led_pin, GPIO.HIGH) GPIO.output(led_pin2, GPIO.HIGH) GPIO.output(led_pin3, GPIO.HIGH) GPIO.output(led_pin4, GPIO.HIGH) p.ChangeDutyCycle(7.5) time.sleep(1) GPIO.output(led_pin, GPIO.HIGH) GPIO.output(led_pin2, GPIO.HIGH) GPIO.output(led_pin3, GPIO.LOW) GPIO.output(led_pin4, GPIO.LOW) p.ChangeDutyCycle(2.5) time.sleep(1) except KeyboardInterrupt: print '\r\nBack to neutral...' p.ChangeDutyCycle(7.5) time.sleep(1) print '\r\nProgam complete.' GPIO.cleanup();
100 Robotics Projects
https://www.youtube.com/watch?v=V32AhUZCrAQ
Raspberry PI 2 – Alternating LEDs
The following Python alternates between two LEDs and then goes dark before repeating.
#!/usr/bin/env python import RPi.GPIO as GPIO import time led_pin = 15 led_pin2 = 37 blinkSpeed = 5/2.0 #blink x times per second GPIO.setwarnings(False) GPIO.setmode(GPIO.BOARD) GPIO.setup(led_pin, GPIO.OUT) GPIO.setup(led_pin2, GPIO.OUT) try: while True: GPIO.output(led_pin, GPIO.HIGH) GPIO.output(led_pin2, GPIO.LOW) time.sleep(blinkSpeed / 3.0) GPIO.output(led_pin, GPIO.LOW) GPIO.output(led_pin2, GPIO.HIGH) time.sleep(blinkSpeed / 3.0) GPIO.output(led_pin, GPIO.LOW) GPIO.output(led_pin2, GPIO.LOW) time.sleep(blinkSpeed / 3.0) finally: print 'finally'