Category: Raspberry PI
How to assemble and connect a Raspberry Pi 4 (Model B 4 GB) DIY
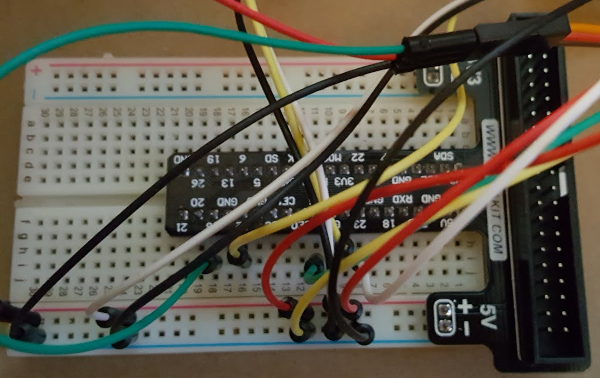
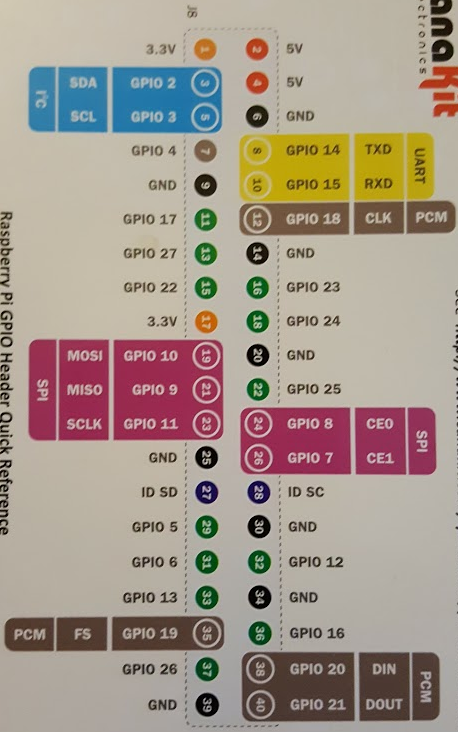
Fan red wire goes to pin 4. Fan black wire goes to pin 6.
~/Desktop/blog.desktop
[Desktop Entry]
Type=Link
Name=TAGENIGMA Blog
Comment=blog
Icon=/usr/share/pixmaps/openbox.xpm
URL=https://tagenigma.com/blog
Pi-Hole Router Filtering
[Pi-Hole] can filter unwanted traffic between your ISP and router.
RPI2 Cover Attachment to Mount Fixed Camera
I made a camera mount that attaches to the lid of my RPI2.
And one for RPI3.
A better Python script for uploading images
Install the [poster] module by running the command-line:
sudo pip install poster
UploadImage.py (RPI)
#!/usr/bin/env python

import urllib, urllib2, os, os.path, sys
from poster.encode import multipart_encode
from poster.streaminghttp import register_openers
from time import sleep

register_openers()

query = { 'id' : 1 }
url = "http://domain.com/path/save_image.php?"+urllib.urlencode(query)

filename = '/dev/shm/mjpeg/cam.jpg'
#print 'Saved: '+filename;

while True:
  try:
    if (os.path.isfile(filename)) :
      values = {'image':open(filename)}
      data, headers = multipart_encode(values)
      headers['User-Agent'] = 'Mozilla/4.0 (compatible; MSIE 5.5; Windows NT)'
      headers['filename'] = filename
      req = urllib2.Request(url, data, headers)
      req.unverifiable = True
      content = urllib2.urlopen(req).read()
  except:
    print 'Upload failed.';
  sleep(1)
Edit the crontab.
sudo crontab -e
Add the following to the end of the crontab.
0 * * * * /sbin/reboot
@reboot python /home/pi/Documents/GetMacAdx.py &
@reboot python /home/pi/Documents/UploadImage.py &
Reboot the Raspberry PI and the security camera is ready to go!
save_image.php (Server)
<?php

if (!isset($_GET['id'])) {
  echo ('Invalid request!');
  exit(0);
}
$id = intval($_GET['id']);

$image = $_FILES["image"];

if ($image == null) {
   echo ("Missing image!");
   exit(0);
} else {
   echo "Saved image!";
   $filename = "image" . $id . ".jpg";
   $tmp_name = $_FILES["image"]["tmp_name"];
   move_uploaded_file($tmp_name, $filename);
}
?>
[Setup wifi on the command-line]
Turn off the camera LED by adding the following to the end of the file.
/boot/config.txt
disable_camera_led=1
Reboot Raspberry PI at Midnight
[Reboot automacticly at midnight]
In the terminal:
sudo crontab -e
Add the one of the lines:
At hour 0 – At midnight
0 0 * * * /sbin/reboot
At minute 0 – Every hour
0 * * * * /sbin/reboot
Control your LEDs with your TV remote?! || Arduino IR Tutorial
I created a [XamarinFormsIoT] Windows Core IoT project which can control LEDs and play sounds on a Raspberry PI 3 using C#/XAML. I used a portable dependency interface to expose the GPIO controller which only exists in the UWP project. GPIO is used to control the LEDs. I also ordered an IR receiver so I can detect IR signals from a remote and it works!

Next I need to [find] a UWP library for LIRC.
The [Arduino-IRremote] has a C++ library that can be converted to UWP.
I followed the idea from the video below.
[How to Control the GPIO on a Raspberry Pi with an IR Remote]
Adafruit: [IR (Infrared) Receiver Sensor]
[Raspberry Pis, Remotes & IR Receivers!]
[Play wav file in Raspberry PI with Windows IoT Core]
RPI: Configure Network Wifi Via the Command Line
Chirping Plush Owl Toy with Adafruit GEMMA
Raspberry PI 2 with Leap
The Leap Motion Controller requires ARM-9 or better and to make work with the Raspberry PI 2 I used a proxy HTTP server to work with the Raspberry PI 2. The Raspberry PI 2 controls servos based on the data from the leap. Each finger on the leap controls a different servo.
The project in action:
Details about the code:
The proxy sends JSON data for the finger rotations (in degrees).
{
  "thumb": 27.815885630721692,
  "index": 8.8111549114070726,
  "middle": 16.216426372741033,
  "ring": 29.267951404867844,
  "pinky": 86.043786182477533
}
The script: `LeapServos.py`
#!/usr/bin/env python

import RPi.GPIO as GPIO
import datetime
import time
import urllib2
import threading
import json

servo_pin2 = 18
servo_pin3 = 22

# 60 degrees / 0.1seconds
servo_speed = 0.1

GPIO.setwarnings(False)
GPIO.setmode(GPIO.BOARD)

GPIO.setup(servo_pin2, GPIO.OUT)
GPIO.setup(servo_pin3, GPIO.OUT)

last_time = datetime.datetime.now()
current_time = datetime.datetime.now()

accuracy = 0.01
rotation1 = 90
rotation2 = 90
rotation3 = 90
rotation4 = 90
rotation5 = 90
timeRotation1 = 0
timeRotation2 = 0
timeRotation3 = 0
timeRotation4 = 0
timeRotation5 = 0
targetRotation1 = 90
targetRotation2 = 90
targetRotation3 = 90
targetRotation4 = 90
targetRotation5 = 90

pulse2 = GPIO.PWM(servo_pin2, 50)
pulse3 = GPIO.PWM(servo_pin3, 50)

logTime = datetime.datetime.now()

stayAlive = True

def getRotation(rotation):
  if (rotation > 90.0):
   return 180
  if (rotation > 45.0):
   return 90
  else:
   return 0

def newTarget():
 global targetRotation1
 global targetRotation2
 global targetRotation3
 global targetRotation4
 global targetRotation5
 while (stayAlive):
  content = urllib2.urlopen("http://192.168.2.97").read()
  #print (content)
  jsonObject = json.loads(content)
  #print (jsonObject)
  #for key in jsonObject:
  # print (key)
  #print ("index: " + str(jsonObject["index"]))
  targetRotation1 = getRotation(jsonObject["thumb"])
  targetRotation2 = getRotation(jsonObject["index"])
  targetRotation3 = getRotation(jsonObject["middle"])
  targetRotation4 = getRotation(jsonObject["ring"])
  targetRotation5 = getRotation(jsonObject["pinky"])
  time.sleep(0)
 print ("Thread complete.")
 return

webThread = threading.Thread(target=newTarget, args=(), kwargs={})
webThread.start()

def log():
 global logTime
 global timeRotation2
 global timeRotation3
 global targetRotation2
 global targetRotation3
 if (logTime < datetime.datetime.now()):
  logTime = datetime.datetime.now() + datetime.timedelta(0, 0.5)
  #print "****"
  #print ("2: TargetRotation: " + str(targetRotation2) + " Time: "+str(timeRotation2))
  #print ("3: TargetRotation: " + str(targetRotation3) + " Time: "+str(timeRotation3))
 return

def reset(pulse):
 pulse.start(7.5);
 pulse.ChangeDutyCycle(7.5)
 time.sleep(0.5)
 pulse.ChangeDutyCycle(0)
 return

def compare(timeRotation, rotation, targetRotation):
 global deltaTime
 if (timeRotation >= 100):
  return 0.25
 elif (rotation == targetRotation):
  if (timeRotation >= 0.0):
   return timeRotation - deltaTime.total_seconds()
  else:
   return timeRotation;
 else:
  print "targetRotation changed."
  return 100

def update(pulse, timeRotation, targetRotation):
 cycle = 0
 if (timeRotation >= 100):
  cycle = 0
  if (targetRotation == 90):
   cycle = 7.5
  elif (targetRotation == 0):
   cycle = 2.5
  else:
   cycle = 12.5
  print ("Cycle: "+str(cycle))
  pulse.ChangeDutyCycle(cycle)
 elif (timeRotation >= 0.0 and ((timeRotation - deltaTime.total_seconds()) <= 0.0)):
  pulse.ChangeDutyCycle(0)
  print ("Cycle: "+str(cycle))
 return targetRotation

try:
 reset(pulse2)
 reset(pulse3)
 time.sleep(1)
 print "setup complete"

 while True:

  last_time = current_time
  current_time = datetime.datetime.now()
  deltaTime = current_time - last_time;

  log()
  timeRotation2 = compare(timeRotation2, rotation2, targetRotation2)
  timeRotation3 = compare(timeRotation3, rotation3, targetRotation3)
  rotation2 = update(pulse2, timeRotation2, targetRotation2);
  rotation3 = update(pulse3, timeRotation3, targetRotation3);

  time.sleep(0);

except KeyboardInterrupt:

 print '\r\nProgram shutdown.'
 stayAlive = False
 time.sleep(1)
 GPIO.cleanup();
 print '\r\nProgam complete.'
Hardware: Camera Board 360 Gooseneck Mount
[Camera Board 360 Gooseneck Mount] enables you to hold the Raspberry Pi camera in any position.

Raspberry Pi Camera Module Streaming to Browser
I found that I can use the Razer HDK2 usb slot to power multiple Raspberry PIs.

Unity is able to stream multiple RPI cameras in VR.

The [RPI Fisheye Camera] has a 160 degree field of view.
Each camera can stream in different eyes for a stereographic effect.

Delight or Horrify Your Friends By Cramming a DIY Alexa Into a Teddy Ruxpin
Raspberry Pi NES console is better than Nintendo’s Classic Mini
DIY Live Stream to YouTube With a Raspberry Pi
Python Camera Adjust Iso For Sunset And Sunrise
Install the `astral` Python package.
sudo pip install astral
Be sure to [set the timezone].
Python script to adjust the iso based on sunrise and sunset.
#get access to the camera
from picamera import PiCamera

#import so we can invoke another script
import subprocess

#get access to the clock
import datetime

#sleep so we can wait on the camera
from time import sleep

# get access to sunrise and sunset
from astral import Location

from fractions import Fraction

# create a camera object
camera = PiCamera()

#set the image resolution
camera.resolution = (1024, 768)

#rotate the camera if upside-down
#camera.rotation = 180

#flip the camera on the horizontal
#camera.hflip = True

i = 0;

#record defaults
framerate = camera.framerate
shutter_speed = camera.shutter_speed
exposure_mode = camera.exposure_mode
iso = camera.iso

while True:

  # Get sunrise and sunset for Monroe, WA
  l = Location()
  l.latitude = 47.887059
  l.longitude = -121.8792998
  l.timezone = 'US/Pacific'

  sunrise = l.sun()['dawn']
  sunriseHour = int(sunrise.strftime('%H'))
  sunriseMinute = int(sunrise.strftime('%M'))
  sunset = l.sun()['sunset']
  sunsetHour = int(sunset.strftime('%H'))
  sunsetMinute = int(sunset.strftime('%M'))

  hours = int(datetime.datetime.now().strftime('%H'))
  minutes = int(datetime.datetime.now().strftime('%M'))
  seconds = int(datetime.datetime.now().strftime('%S'))
  #print 'hours='+hours+' minutes='+minutes+' seconds='+seconds
  if (hours > sunriseHour and hours < sunsetHour):
    #print 'work in the light'
    camera.framerate = framerate
    camera.shutter_speed = shutter_speed
    camera.exposure_mode = exposure_mode
    camera.iso = iso
  else:
    #print 'work in the dark'
    camera.framerate = Fraction(1,6)
    camera.shutter_speed = 600000
    camera.exposure_mode = 'off'
    camera.iso = 800

  filename = 'image'+str(i)+'.jpg'

  #save image locally
  camera.capture(filename)

  #invoke the script to upload the image
  subprocess.call('python save_image.py '+filename, shell=True)

  sleep(3)

  i = (i + 1) % 12
The new LIFX smart bulb emits infrared light to help security cameras see better
The New Raspberry Pi OS Is Here, and It Looks Great
Farmbot.io
Ben Heck’s Raspberry Pi Zero Portable Computer
Plantronics Voyager Legend with sdptool
sdptool records 48:C1:AC:E2:21:A7
Service RecHandle: 0x10000
Service Class ID List:
“PnP Information” (0x1200)
Service Name: Hands-Free unit
Service RecHandle: 0x10001
Service Class ID List:
“Handsfree” (0x111e)
“Generic Audio” (0x1203)
Protocol Descriptor List:
“L2CAP” (0x0100)
“RFCOMM” (0x0003)
Channel: 1
Language Base Attr List:
code_ISO639: 0x656e
encoding: 0x6a
base_offset: 0x100
Profile Descriptor List:
“Handsfree” (0x111e)
Version: 0x0106
Service Name: Headset
Service RecHandle: 0x10002
Service Class ID List:
“Headset” (0x1108)
“” (0x1131)
“Generic Audio” (0x1203)
Protocol Descriptor List:
“L2CAP” (0x0100)
“RFCOMM” (0x0003)
Channel: 2
Language Base Attr List:
code_ISO639: 0x656e
encoding: 0x6a
base_offset: 0x100
Profile Descriptor List:
“Headset” (0x1108)
Version: 0x0102
Service RecHandle: 0x10003
Service Class ID List:
“Audio Sink” (0x110b)
Protocol Descriptor List:
“L2CAP” (0x0100)
PSM: 25
“AVDTP” (0x0019)
uint16: 0x0102
Profile Descriptor List:
“Advanced Audio” (0x110d)
Version: 0x0102
Service RecHandle: 0x10004
Service Class ID List:
“AV Remote” (0x110e)
“AV Remote Controller” (0x110f)
Protocol Descriptor List:
“L2CAP” (0x0100)
PSM: 23
“AVCTP” (0x0017)
uint16: 0x0103
Profile Descriptor List:
“AV Remote” (0x110e)
Version: 0x0104
Service RecHandle: 0x10005
Service Class ID List:
“AV Remote Target” (0x110c)
Protocol Descriptor List:
“L2CAP” (0x0100)
PSM: 23
“AVCTP” (0x0017)
uint16: 0x0103
Profile Descriptor List:
“AV Remote” (0x110e)
Version: 0x0104
Service Name: PBAP Client
Service RecHandle: 0x10006
Service Class ID List:
“Phonebook Access – PCE” (0x112e)
Profile Descriptor List:
“Phonebook Access” (0x1130)
Version: 0x0101
Service Name: PltHeadsetDataService
Service RecHandle: 0x10007
Service Class ID List:
UUID 128: 82972387-294e-4d62-97b5-2668aa35f618
Protocol Descriptor List:
“L2CAP” (0x0100)
“RFCOMM” (0x0003)
Channel: 5
Language Base Attr List:
code_ISO639: 0x656e
encoding: 0x6a
base_offset: 0x100
Plantronic Voyager Legend Bluetooth and PyOBEX
After running into PBAP profile issues with BlueZ, this stackoverflow post [Phone Book Access (PBAP) client for Linux (Raspberry Pi)] suggested trying [PyOBEX].
Install the Python library.
sudo pip install PyOBEX
The [PyOBEX] repository needs Mecurial.
sudo apt-get install mercurial
Clone the examples.
hg clone https://user@bitbucket.org/dboddie/pyobex
Plantronic Voyager Legend Bluetooth and BlueZ
According to the specifications, Platronics Voyager Legend uses [Phone Book Access Profile (PBAP)]. BlueZ lists [PBAP] as a supported protocol.
python test/test-device list
48:C1:AC:E2:21:A7 PLT_Legend
python test/test-device connect 48:C1:AC:E2:21:A7 PBAP
Name=PLT_Legend
Paired=1
Modalias=bluetooth:v0055p0113d005D
Connected=0
Address=48:C1:AC:E2:21:A7
Alias=PLT_Legend
dbus.Dictionary({dbus.String(u’Name’): dbus.String(u’PLT_Legend’, variant_level=1), dbus.String(u’Paired’): dbus.Boolean(True, variant_level=1), dbus.String(u’Modalias’): dbus.String(u’bluetooth:v0055p0113d005D’, variant_level=1), dbus.String(u’Adapter’): dbus.ObjectPath(‘/org/bluez/hci0′, variant_level=1), dbus.String(u’LegacyPairing’): dbus.Boolean(False, variant_level=1), dbus.String(u’Alias’): dbus.String(u’PLT_Legend’, variant_level=1), dbus.String(u’Connected’): dbus.Boolean(False, variant_level=1), dbus.String(u’UUIDs’): dbus.Array([dbus.String(u’00001108-0000-1000-8000-00805f9b34fb’), dbus.String(u’0000110b-0000-1000-8000-00805f9b34fb’), dbus.String(u’0000110c-0000-1000-8000-00805f9b34fb’), dbus.String(u’0000110e-0000-1000-8000-00805f9b34fb’), dbus.String(u’0000111e-0000-1000-8000-00805f9b34fb’), dbus.String(u’00001200-0000-1000-8000-00805f9b34fb’), dbus.String(u’82972387-294e-4d62-97b5-2668aa35f618′)], signature=dbus.Signature(‘s’), variant_level=1), dbus.String(u’Address’): dbus.String(u’48:C1:AC:E2:21:A7′, variant_level=1), dbus.String(u’Blocked’): dbus.Boolean(False, variant_level=1), dbus.String(u’Class’): dbus.UInt32(2360324L, variant_level=1), dbus.String(u’Trusted’): dbus.Boolean(True, variant_level=1), dbus.String(u’Icon’): dbus.String(u’audio-card’, variant_level=1)}, signature=dbus.Signature(‘sv’))
Traceback (most recent call last):
File “./test-device”, line 117, in
device.ConnectProfile(args[2])
File “/usr/lib/python2.7/dist-packages/dbus/proxies.py”, line 70, in __call__
return self._proxy_method(*args, **keywords)
File “/usr/lib/python2.7/dist-packages/dbus/proxies.py”, line 145, in __call__
**keywords)
File “/usr/lib/python2.7/dist-packages/dbus/connection.py”, line 651, in call_blocking
message, timeout)
dbus.exceptions.DBusException: org.bluez.Error.NotAvailable: Operation currently not available
python test/pbap-client 48:C1:AC:E2:21:A7
Creating Session
Traceback (most recent call last):
File “pbap-client”, line 128, in
session_path = client.CreateSession(sys.argv[1], { “Target”: “PBAP” })
File “/usr/lib/python2.7/dist-packages/dbus/proxies.py”, line 70, in __call__
return self._proxy_method(*args, **keywords)
File “/usr/lib/python2.7/dist-packages/dbus/proxies.py”, line 145, in __call__
**keywords)
File “/usr/lib/python2.7/dist-packages/dbus/connection.py”, line 651, in call_blocking
message, timeout)
dbus.exceptions.DBusException: org.freedesktop.DBus.Error.UnknownObject: Method “CreateSession” with signature “sa{ss}” on interface “org.bluez.obex.Client1” doesn’t exist
Python with Bluetooth
I’m making another attempt to write a Python script that can list the paired Bluetooth devices.
Add library dependencies for gatt bluetooth protocol.
sudo apt-get install libperl-dev libgtk2.0-dev libboost-python-dev libboost-thread-dev libbluetooth-dev libglib2.0-dev python-dev
Install the Python BlueZ libraries.
sudo apt-get install python-bluez
That allows the Python BlueZ library to install.
sudo pip install PyBluez
sudo pip3 install PyBluez
Add the gattlib to support the gatt bluetooth protocol. Make sure all apps are closed as the `gattlib` setup scripts use a lot of memory and will not complete without sufficient RAM.
sudo pip install gattlib
sudo pip3 install gattlib
The [test-device python script] is able to list paired Bluetooth devices.
python test/test-device list
The org.freedesktop.DBus.Properties has a block of data on the PLT_Legend Bluetooth headset.
dbus.Dictionary({dbus.String(u’Name’): dbus.String(u’PLT_Legend’, variant_level=1), dbus.String(u’Paired’): dbus.Boolean(True, variant_level=1), dbus.String(u’Modalias’): dbus.String(u’bluetooth:v0055p0113d005D’, variant_level=1), dbus.String(u’Adapter’): dbus.ObjectPath(‘/org/bluez/hci0′, variant_level=1), dbus.String(u’LegacyPairing’): dbus.Boolean(False, variant_level=1), dbus.String(u’Alias’): dbus.String(u’PLT_Legend’, variant_level=1), dbus.String(u’Connected’): dbus.Boolean(False, variant_level=1), dbus.String(u’UUIDs’): dbus.Array([dbus.String(u’00001108-0000-1000-8000-00805f9b34fb’), dbus.String(u’0000110b-0000-1000-8000-00805f9b34fb’), dbus.String(u’0000110c-0000-1000-8000-00805f9b34fb’), dbus.String(u’0000110e-0000-1000-8000-00805f9b34fb’), dbus.String(u’0000111e-0000-1000-8000-00805f9b34fb’), dbus.String(u’00001200-0000-1000-8000-00805f9b34fb’), dbus.String(u’82972387-294e-4d62-97b5-2668aa35f618′)], signature=dbus.Signature(‘s’), variant_level=1), dbus.String(u’Address’): dbus.String(u’48:C1:AC:E2:21:A7′, variant_level=1), dbus.String(u’Blocked’): dbus.Boolean(False, variant_level=1), dbus.String(u’Class’): dbus.UInt32(2360324L, variant_level=1), dbus.String(u’Trusted’): dbus.Boolean(True, variant_level=1), dbus.String(u’Icon’): dbus.String(u’audio-card’, variant_level=1)}, signature=dbus.Signature(‘sv’))
Resources:
[bluez]
[pybluez]
[Android Linux / Raspberry Pi Bluetooth communication]
[bluetooth commands]
List paired bluetooth devices.
pi@raspberrypi:~/ $ bluetoothctl
[NEW] Controller B8:27:EB:05:8D:D8 raspberrypi [default]
[NEW] Device 48:C1:AC:E2:21:A7 PLT_Legend
Get device info from `bluetoothctl` console.
[bluetooth]# info 48:C1:AC:E2:21:A7
Device 48:C1:AC:E2:21:A7
 Name: PLT_Legend
 Alias: PLT_Legend
 Class: 0x240404
 Icon: audio-card
 Paired: yes
 Trusted: yes
 Blocked: no
 Connected: no
 LegacyPairing: no
 UUID: Headset (00001108-0000-1000-8000-00805f9b34fb)
 UUID: Audio Sink (0000110b-0000-1000-8000-00805f9b34fb)
 UUID: A/V Remote Control Target (0000110c-0000-1000-8000-00805f9b34fb)
 UUID: A/V Remote Control (0000110e-0000-1000-8000-00805f9b34fb)
 UUID: Handsfree (0000111e-0000-1000-8000-00805f9b34fb)
 UUID: PnP Information (00001200-0000-1000-8000-00805f9b34fb)
 UUID: Vendor specific (82972387-294e-4d62-97b5-2668aa35f618)
 Modalias: bluetooth:v0055p0113d005D
Bluetooth – Installing and Using Bluetooth on the Raspberry Pi
Experimental
Edit the deb sources list.
/etc/apt/sources.list.d/raspi.list
Add jessie-backports to the `raspi.list` by adding the following line to the file.
deb http://ftp.debian.org/debian jessie-backports main
Suppress the public key warnings.
gpg --keyserver pgpkeys.mit.edu --recv-key 8B48AD6246925553
gpg -a --export 8B48AD6246925553 | sudo apt-key add -

gpg --keyserver pgpkeys.mit.edu --recv-key 7638D0442B90D010
gpg -a --export 7638D0442B90D010 | sudo apt-key add -
Update apt-get.
sudo apt-get update
Install the bluetooth manager
Upgrade the packages.
sudo apt-get upgrade
Install `blueman`.
sudo apt-get -t jessie-backports install bluetooth blueman bluez python-gobject python-gobject-2 pulseaudio-module-bluetooth
Turn on bluetooth device on boot
If you require turning on your bluetooth device at boot time automatically, for instance when you require keyboard / mouse support. You can add a udev rule to enable that. Additionally, you need to make sure you have the package bluez-utils installed.
Create `/etc/udev/rules.d/50-bluetooth-hci-auto-poweron.rules` with the following content.
ACTION=="add", SUBSYSTEM=="bluetooth", KERNEL=="hci[0-9]*", RUN+="/bin/hciconfig %k up"
Use pavucontrol to configure pulse audio
[pavucontrol] is a GUI front-end for [PulseAudio].
sudo apt-get -t jessie-backports install pavucontrol
[blueman-project] [issue]
[enable analog out]
[Bluetooth – Installing and Using Bluetooth on the Raspberry Pi]
[Installing the Raspberry Pi Nano Bluetooth Dongle]
pi@raspberrypi:~/Documents/PythonScripts/Microphone $ bluetoothctl
[NEW] Controller B8:27:EB:22:51:00 raspberrypi [default]
[NEW] Device 48:C1:AC:E2:21:A7 PLT_Legend
[bluetooth]# quit
pi@raspberrypi:~/Documents/PythonScripts/Microphone $ sudo l2ping -c 1 48:C1:AC:E2:21:A7
Ping: 48:C1:AC:E2:21:A7 from B8:27:EB:22:51:00 (data size 44) ...
16 bytes from 48:C1:AC:E2:21:A7 id 0 time 8.55ms
1 sent, 1 received, 0% loss
pi@raspberrypi:~ $ arecord -l
**** List of CAPTURE Hardware Devices ****