[duolingo.com] teaches multiple written/spoken languages for free.
Category: Tutorials
Curiosity Stream – Documentaries
How Mark Rober is beating the YouTube Algorithm (Genius Strategy)
Consuming Native NuGet Packages in Visual Studio
React Hooks Coronavirus API Code Along
GoPro HERO 8 BLACK Tutorial: How To Get Started
How to create a ClickOnce application | lynda.com tutorial
YouTube LetsCodeGames Channel
MODO: Six Tips in 60 Seconds
Tutorials: Free Tutorials on Ableton Live
[Ableton Live] is bundled with the [Novation Launchpad].
The Ableton site hosts free [Ableton Live Tutorials].
Ableton: Electronic Music Production w/ Ableton Live 9! Dubspot Course Preview!
Udemy: Ableton Live Introduction
Udemy has a free music course on [Ableton Live Introduction].
Udemy: Create Electronic Music With Reason 9
Udemy has a free music course on [Create Electronic Music With Reason 9].
Khan Academy: Back to School
Android Studio Tutorial For Beginners – How To Build an Android App
Mark Price made an excellent 1-hour tutorial for getting started building your own Java app for Android using Android Studio. It’s a good primer for getting started setting up the app and creating a user interface to do some math logic.
Facebook Clear Cache
If Facebook ever shows the wrong image or video preview, you can use the [Facebook Debug Tool] to clear the cache. Delete the post and scrape again to see the expected image.
Ported Nehe Lesson 10 to Firefox plugin
I recently decided to port the Nehe tutorials to work from within Firefox, just for the fun of it. You can find all the ported plugins in [this folder]. You’ll need the [Mozilla Gecko Win32 SDK] to be able to compile the lessons.

Ported Nehe Lesson 9 to Firefox plugin
I recently decided to port the Nehe tutorials to work from within Firefox, just for the fun of it. You can find all the ported plugins in [this folder]. You’ll need the [Mozilla Gecko Win32 SDK] to be able to compile the lessons.

Ported Nehe Lesson 8 to Firefox plugin
I recently decided to port the Nehe tutorials to work from within Firefox, just for the fun of it. You can find all the ported plugins in [this folder]. You’ll need the [Mozilla Gecko Win32 SDK] to be able to compile the lessons.

Ported Nehe Lesson 7 to Firefox plugin
I recently decided to port the Nehe tutorials to work from within Firefox, just for the fun of it. You can find all the ported plugins in [this folder]. You’ll need the [Mozilla Gecko Win32 SDK] to be able to compile the lessons.

Convert MAKEINTRESOURCE to C#
Ran into a small issue. There’s a C++ Macro called MAKEINTRESOURCE that is used heavily in Win32 programming. I’d be very interested in knowing if anyone has ported the macro to C#. Here is an [Article] that explains the problem in detail.
Actually the problem is simplier than I thought. Anything that uses MAKEINTRESOURCE, just pass a UInt16 in the field instead of a LPSTR and it works just fine.
Marshaling Data Types With Platform Invoke in C#
This is worth studying for you game designers/programmers. With DotNet and CSharp a lot of you are going the Windows.Forms route. I just wanted to present to you an alternative. The grunt work is done, so all you need to do is include the CSharp*.cs files and you are ready to go.
For fun I ported “GameTutorials Triangle(First OpenGL Program” to C# using
Win32. It keeps the existing framework of the original tutorial without using
Windows Forms. Take a look. This will safe others time that might want to
program OpenGL with Win32 calls in C#.
Tutorial: “[Triangle – My First OpenGL Program in C#]”
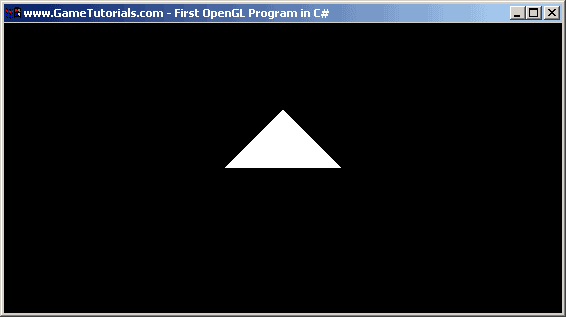
Update: Full Screen Mode now Works. Default Icon is now working. Figured out the MAKEINTRESOURCE problem. Some things that don’t work perfectly yet are commented out. For example, a memory leak that happens during painting. Anyone is welcome to email bugs or fixes.
I should note that I used the OpenGL ports from Nehe, but all the Win32 ports
are mainly from me. I used Pinvoke as a reference and found several answers in forums that blurred by.
[MSDN] Great mapping table between unmanaged types to C#.
Another great resource: [Pinvoke.net]
Creating .NET Web Clients with Mono
If you are not familar with Web References or created web clients that connect to Web Services, here are detailed step by step screenshots (8 in all) that will get you up to speed. You may have Visual Studio .NET or Visual Studio .NET 2003 or Mono MCS. And with these steps you can get a web service up and running at least on Win2k, WinXP, or Win2003. See story for details…
To start we just need a basic C# Console App. Go into Visual Studio .NET. Click [File] – > [New] -> [Project]. Click [Project Types] -> [Visual C# Projects]. Click [Console Application]. The location can be anywhere on your harddrive, so pick a suitable location. The project name will default to ConsoleApplication1. Then click OK.

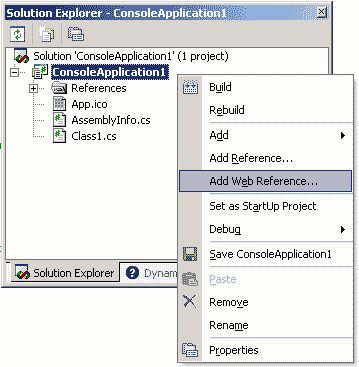
From the basic Console App, right-click the project name [ConsoleApplication1] and select [Add Web Reference]. This will initiate the Web Reference dialog.
Enter the URL to the Web Service you plan to connect to. This is the same location from the previous [Web Service Tutorial]. Click [Add Web Reference] and this will add the appropriate source files to the project.

Finishing the [Add Web Service Dialog] added the web reference files to the project as you see here. The WSDL file is what I think the coolest part of Web Services & Web References. The file not only defines what each of the method names are in the Web Service, it defines the type of each argument. So if you code ever gets out of sync with the WSDL, this file will tell the compiler about it.
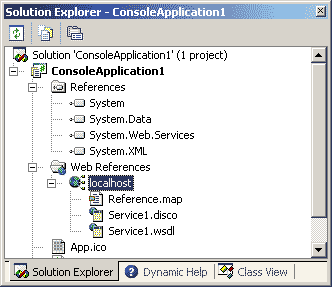
At some point you may decide to change the Web Service method parameters or even add new methods. If you do, you need to update the Web Reference which will automatically get the new changes. If the changes are serious, you will get compile errors which detect that either the method name changed, the number of method arguments changed, or the parameter types changed. If these were just WebRequests you might have never know that changes occurred. Thanks to Web Services, you’ll know right away.

Open the Class1.cs source file. Web References are accessed in an object oriented way. You have to declare them as an object and the initial connection is created by using new. The web service method is invoked here by using objService1.HelloWorld(). The neat part here is that the method is strongly typed. So if you try and pass the wrong parameters, the application won’t even compile. This makes web development really simple. You can use any parameters you like, I just used the default void parameters to make this example simple. The HelloWorld() method returns a String which Console.WriteLine happily outputs to the Console screen.

Hey look! Upon running the application we see “Hello World” which is the String that was returned by the HelloWorld method of WebService1. This may run and close so fast that you need to run from a console. In this example we used a console app. Web References can be used in all the project types. You can even have Web Services that also use Web References to get their data. Although as always, the more layers you add, the slower the app might function. So keep it in mind.

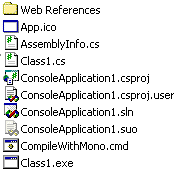
You can download the [project files] associated with this tutorial. Included in the project files is a script called CompileWithMono.cmd which depends on you having Mono installed. If you don’t have Visual Studio .NET you will need to compile with the Mono script.
Creating .NET WebServices with Mono
If you are not familar with Web Services, here are detailed step by step screenshots (15 in all) that will get you up to speed.
You may have Visual Studio .NET or Visual Studio .NET 2003 or Mono MCS. And with these steps you can get a web service up and running at least on Win2k, WinXP, or Win2003. See story for details…
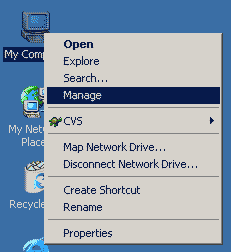
First of all, a few Windows Services need to be running in order to get the built in IIS 5.0 or IIS 6.0 web server up and running. Start by right-clicking My Computer on the Desktop and then select Manage.
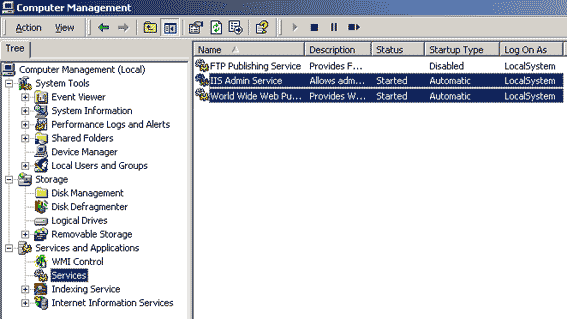
This is the Management Console and you’ll find which services are running by looking under [Computer Management] -> [Services and Applications] -> [Services]. The two important services that need to be running are the IIS Admin Service and World Wide Web Publishing. Either can be set to Automatic or Manual. Both need to be started. IIS Admin Services is a dependency of WWW Publishing. If you have WinXP Home Edition, you will need to install IIS. I’ll refer you to this tutorial [IIS on WinXP Home].
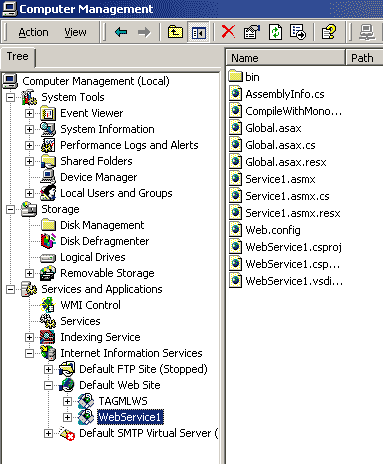
If you have Visual Studio .Net the next several steps are automatically done for you using the ASP .NET wizard. If you don’t have Visual Studio .Net then a virtual directory needs to be setup in IIS that looks like the following. I’ll show you the steps in detail next.
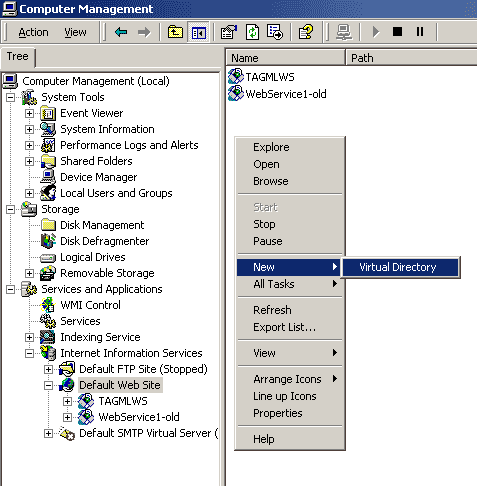
First of all, you need to create a directory which is going to hold your Web Service source files. The ASP .NET Web Service defaults to making a directory in C:/Inetpub/wwwroot/WebService1 for you, but since this is a virtual directory, you can put it anywhere the web server has access to (stick to something on the web server’s harddrive). With your destination directory created, go into the Management Console under [Computer Management] -> [Services and Applications] -> [Internet Information Service] -> [Default Web Site]. Right-click the white space in the right panel and select [New] -> [Virtual Directory]. Note: Default Web Site is created by default, but if it has been deleted you may need to create it.
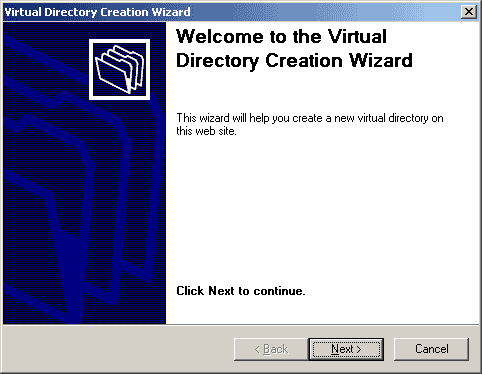
Just click Next.
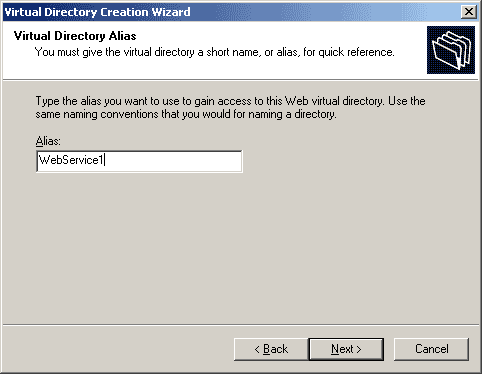
The ASP .NET Web Service defaults to using “WebService1” but you can use any name here that describes your web service. Keep in mind that this name will be used in the code of future clients. Then click Next.
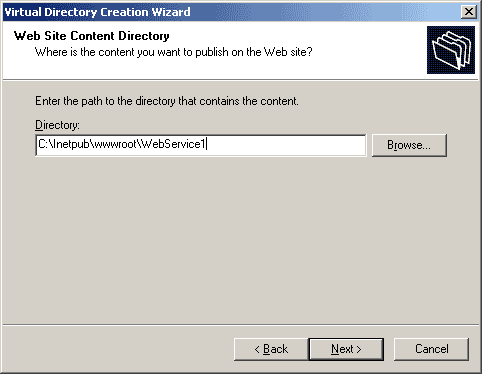
Specify the directory that you created to hold you source files. Then click Next.
To be able to run your web service code you only need [Read] and [Run scripts] checked. Consider security risks if you check the others. Then click Next.
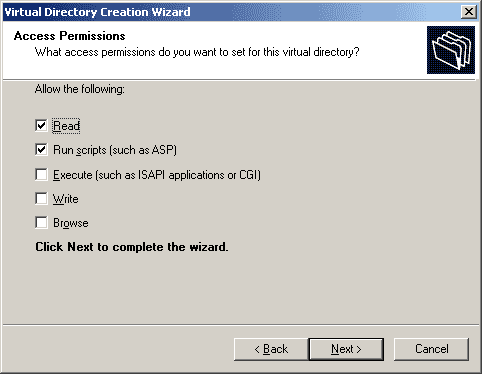
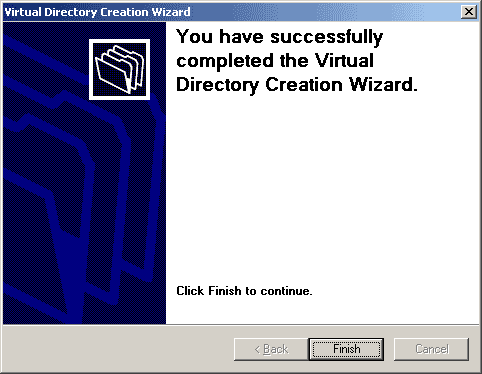
Just click Next. And your virtual directory is created. Remember these steps are automatic using the ASP .NET Web Service wizard. So if you are using the wizard, let do the above steps for you. Otherwise, it will complain that the virtual directory already exists.
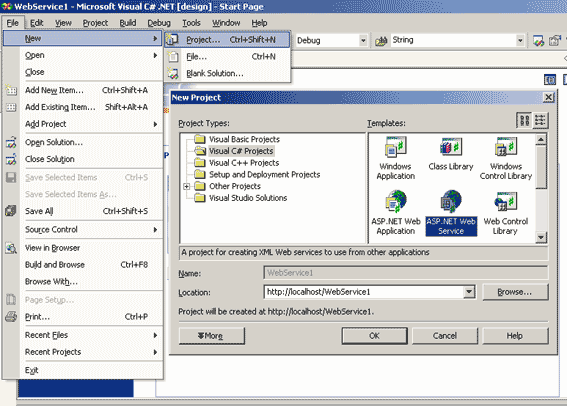
To run the ASP .NET Web Service wizard go into Visual Studio .NET. Click [File] – > [New] -> [Project]. Click [Project Types] -> [Visual C# Projects]. Click [ASP .NET Web Service]. The location will default to WebService1. Then click OK.
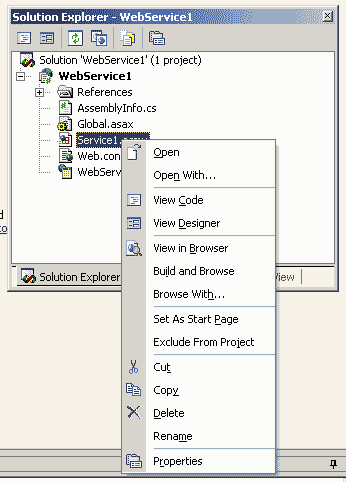
The wizard will complete the setup process and auto-generate source files that are added to the project solution. At this point the web service will compile, although there won’t be any methods until you alter the source. Right-click [Service1.asmx] and select [View Code].
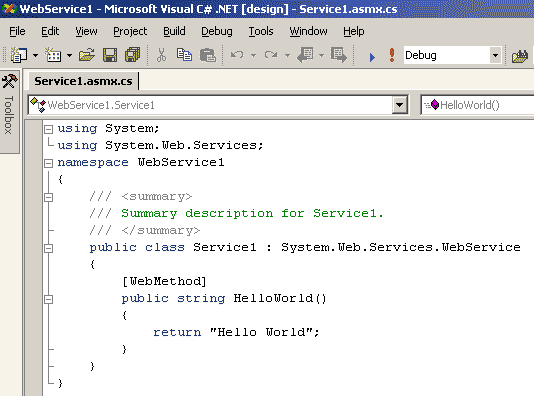
The code below is all the code you’ll need to successfully add your first method to the web service. The [WebMethod] attribute allows the compiler to auto generate the XSDL and XML you’ll need to interface this server with a client later. Add yourself a web method and compile the code.
If you don’t have Visual Studio .NET you can jump to this step. And the bottom of this page is a link to download the source files. Unpack the files in the default directory c:/inetpub/wwwroot as indicated by the earlier steps. Follow the steps to create the virtual directory that will point to these files. Assuming you have installed Mono and the bin directory of Mono is in your path, you will be able to run the included Script labelled [CompileWithMono.cmd]. This will let you compile any modications you make to the [WebMethods] that you plan to add to the web service.
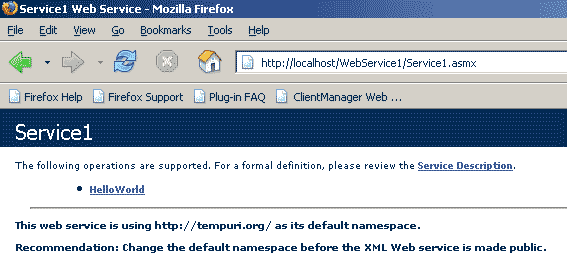
At this point, your web service is created. All you need to do is either hit F5 to step through the code (using break-points) or execute the application which will launch the default browser and bring up the web service main page. This page lists all the [WebMethods] you’ve added to the web service. All the methods here can be called from a web reference in a web client app you may choose to write later.
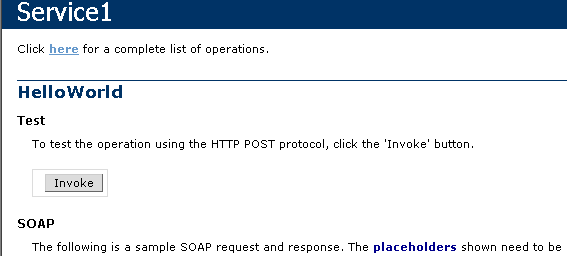
For example, here is the HelloWorld method we just added. This page describes the input and output for the method using SOAP or HTTP POST. All this information is auto-generated for you by simply using the [WebMethod] attribute from the previous step. Since the web service was called from localhost, the invoke button appears to call the method.
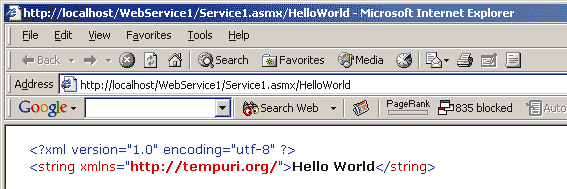
By invoking the method, the parameters (if any) are sent to the method and the results are returned. The resulting page is all nicely defined XML.
You can download the [project files] associated with this tutorial. Included in the project files is a script called CompileWithMono.cmd which depends on you having Mono installed. If you don’t have Visual Studio .NET you will need to compile with the Mono script.
Compiling C# Win32 OpenGL with Mono
[Mono] is an Open Source equivalent to .NET which is also compatible with the existing framework. In theory, the pieces you compile in either .NET or Mono should be interchangeable. Mono was originally created to enable .NET runtimes to run on Linux. And now there are Mono binaries for Windows and Linux. Mono 1.0 was officially released June 30,2004….
Given that if you don’t have a copy of .NET or .NET 2003 you can compile with the “free” Mono compiler called “MCS”. MCS is a command line tool, so a typical project like [Triangle (My First OpenGL Program in C#] would use the following command line options to compile.
mcs Class1.cs CSharp.GLU.cs CSharp.OpenGL.cs CSharp.WGL.cs CSharp.Win32.cs
Just make Sure Mono is part of your path, typically the mono path is set to:
c:/Program Files/Mono-1.0/bin